
Oftentimes, peer review assignments are structured so that students are still in a student role, and their writing is academic class work. This presents a missed opportunity: You can more intentionally structure your peer review process to model best practices for giving feedback in professional contexts. This format is ideal for graduate and upper-division undergraduate courses, as students are preparing to engage with or are already engaging with colleagues and researchers in their field.
The 5 steps outlined here, which are written for a student audience, provide them with a framework and guidelines for engaging in a professional feedback process.
Since peer review often works better in a synchronous format, I’ve collaborated with instructors for online classes on a process for organizing peer review meetings via web conference. If you’d like to learn more about how to set up web synchronous peer review sessions in your own course, check out my recommended instructions [PDF download].
Step 1: Learn what feedback the writer wants.
In your classes (and in professional settings), it’s important that you share a self-assessment and some guiding questions with anyone who will be reviewing your writing. Key concerns and areas for feedback might include the following:
- What are you trying to do with this document (i.e., what is its purpose/context, and who is your audience)?
- What would you like feedback on?
- How far along is your document in its revision process?
- Is there anything you don’t want feedback on (e.g., parts you know are still unfinished, parts you didn’t give much attention to yet)?
This information provides a “framing text” for reviewing a draft. If a writer hasn’t provided you with it, be sure to ask for it before you start giving feedback on their draft.
Step 2: Consider how far along the draft is.
Early-stage drafts need different feedback than documents further along in the writing and document review process. Consider what type of advice the writer needs based on what stage their draft is in. (See Figure 1.)

Step 3: Consider which feedback tool to use.
All of these tools are recommended for conducting peer review.
Google Docs
- works well for all stages of review
- allows you to add margin comments and/or suggest edits to text that the writer can opt to accept or reject (in Suggesting mode)
- allows you to edit documents synchronously with writers and/or other reviewers and have in-doc chat sessions
Note that with Google Docs, you’ll need to hold off on incorporating any suggested changes and comments until after all of your group members and your instructor have reviewed them.
Microsoft Word
- works well for all stages of review
- allows you to add margin comments and/or make changes to text that the writer can opt to accept or reject (via the Track Changes feature)
- allows you to create a collaborate document that can be edited in your browser if you use Office 365, or you can use the desktop app to create and save different file versions on your computer
Note that if you use the Office 365 version of Word, you’ll need to hold off on incorporating any suggested changes and comments until after all of your group members and your instructor have reviewed them.
Adobe Acrobat
- works best for early stage reviews and second drafts
- allows you to add comments and annotate text but not make direct changes to it
- encourages reviewers to focus on higher-order issues
- ensures that your document’s formatting is preserved, so Acrobat is a better option if your draft has unique fonts or a complicated layout.
Step 4: Make margin comments.
Use a commenting feature to mark points in the text where you think revision is needed or to give praise. Here are some tips for writing good margin comments on a draft:
1 | Skim the entire draft.
Give the draft a thorough read-through before you start making any margin comments. As you read, note strengths and weaknesses that are repeated in the writing. Pointing out patterns to the writer will assure them that you read their draft closely, and it will help you prioritize which topics you’ll address in your comments.
2 | Avoid taking over the writer’s text.
A lot of comments and direct edits (like the ones in this example) may offend or simply depress a writer. Instead, prioritize 3-4 topics for feedback that will have the most impact at the current stage of the writing process. (If you aren’t sure which topics to address, you could use the hierarchy of rhetorical concerns to guide your decision.) Also, be sure to note not only what revisions should be made but also what the writer might consider keeping as-is.
3 | Be mindful of your tone.
As you comment on the draft, talk about the document and potential readers’ responses to it, not the writer. For example, don’t write,
You don’t explain clearly why this detail is relevant.
Here’s a better way to phrase the same thought:
This detail gets a lot of attention. I’m not sure your readers will understand why.
Consider that as a peer reviewer, your role is to model for the writer how a reader will react to their draft. Instead of using “you” statements, phrase your feedback as “I” statements, make notes on elements of the writing itself, and ask questions.
4 | Offer specific positive feedback.
Rather than only looking for where the writing falls short, you should also be asking, “What’s working well?” Identifying moments in the writing or elements of the draft that you find effective and explaining why can help the writer repeat and build on their strengths.
Just be sure that your praise is genuine. Don’t just share general evaluative comments, like “Good job!” or “That’s a perfect thesis!” Instead, and point to specific examples in the writing, for example,
I appreciated your reflection on the challenges you personally faced in making it through the college admissions process as a first-generation student. These details really made your overall framing, that first-gen students need more support to make it to college, clear and compelling.
Step 5: Write a summary comment for the draft.
Write a long comment to summarize your margin comments. You can place it at the beginning or end of the draft. Before you begin writing it, consider a couple of things:
- the set of standards or rubric against which the document will be assessed, e.g., grading criteria on an assignment sheet or other guidelines, and
- the writer’s framing text (from Step 1).
Then, build your summary comment from 3 components. (See Figure 2.)
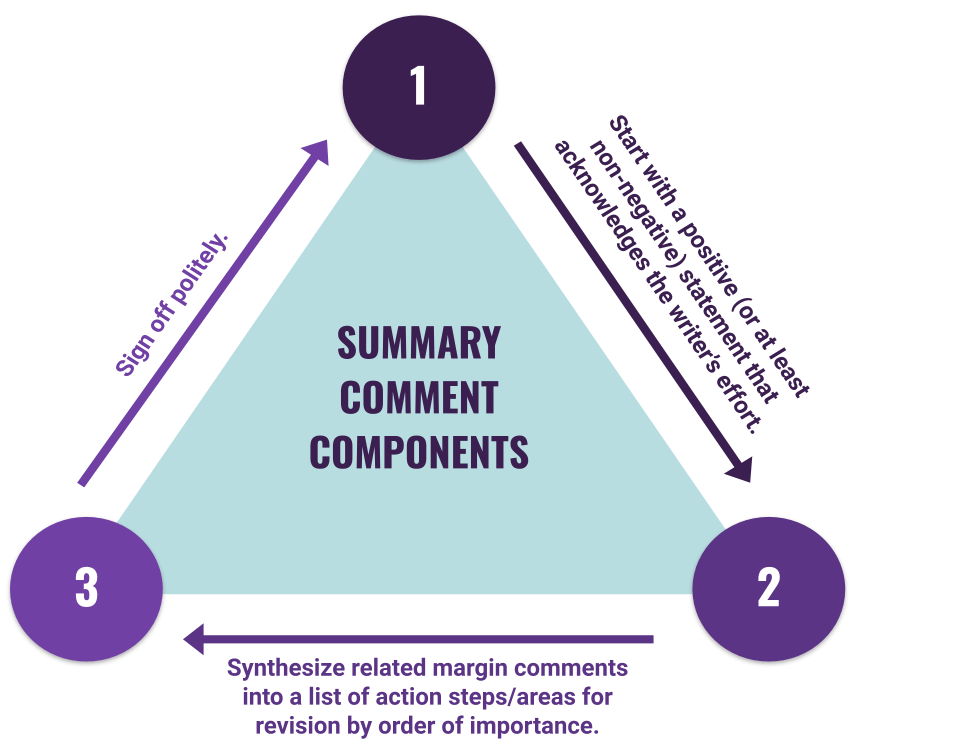
As you synthesize your margin comments into your summary comment, consider that you can now provide more detail. Try to clearly explain why the change you’re suggesting is important it for revision and how it will improve the draft.